
Fabrication
In order to achieve the tight specifications that this project calls for, the team contracted with Sargent Corporation to help build the frame of the jogger under close supervision. Having professionals build the frame guaranteed that the jogger was of the utmost integrity and that the person using the jogger will have complete confidence in the product. A work package was made that included multiple drawings containing different views of the jogger. These drawings show different cut sections with all the dimensions and specifications so that Sargent could understand exactly what needs to be done to fabricate the frame. An example of one of these pages is given in the figure below:
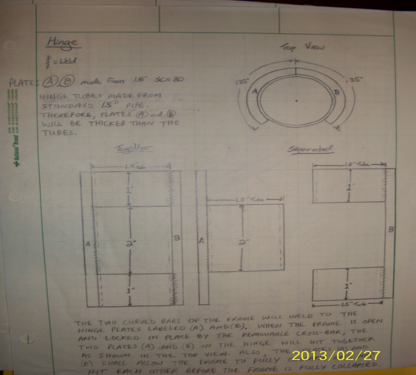
These drawings enabled Sargent to give an accurate estimate on the total price to complete the fabrication of the frame. All the materials to build the frame were provided, and the fabrication was done under supervision and command at Sargent’s shop in Stillwater, Maine. Sargent cut, bent, fitted, and welded the pipe for the frame according to the design specifications provided in the design.
Paint
Once Sargent Corporation finished with fabrication, it was time to call in the painting experts at Downeast Autobody in Brewer, Maine. To continue toward our goal of a professional looking end product, the folks at Downeast were nice enough to provide step by step instructions on the painting process. Through observation, and explanations provided by the expert painters at Downeast, the entire process was documented from start to finish.
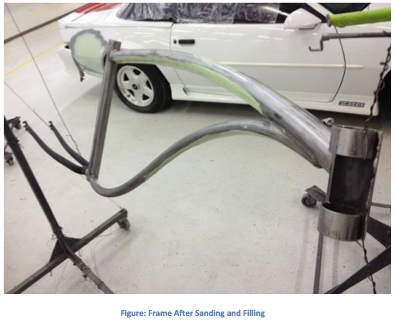
After hanging each frame component and appropriately applying painters tape to cover sections that were not to be painted, each piece was sanded down with one-hundred eighty (180) or two-hundred twenty (220) grit sandpaper to remove any impurities before applying body filler. The frame was then wiped down with a clean rag to remove the residual particles from sanding, and body filler was applied to the frame pieces to smooth out all kinks, scratches and other imperfections in the tubing. Through repetition, the frame was then re-sanded and more body filler was applied until the surface of the frame was completely smooth. The figure below depicts a frame component after sanding and filling.
After hanging each frame component and appropriately applying painters tape to cover sections that were not to be painted, each piece was sanded down with one-hundred eighty (180) or two-hundred twenty (220) grit sandpaper to remove any impurities before applying body filler. The frame was then wiped down with a clean rag to remove the residual particles from sanding, and body filler was applied to the frame pieces to smooth out all kinks, scratches and other imperfections in the tubing. Through repetition, the frame was then re-sanded and more body filler was applied until the surface of the frame was completely smooth. The figure below depicts a frame component after sanding and filling.
After the surface was prepared, the frame was again wiped down with a clean cloth and a water-based primer coat, grey in color, was applied to the frame. This first primer coat was allowed to set, or ‘tack up’ for five (5) to eight (8) minutes. Once the first coat was tacky, a second coat of the same primer was applied, and the frame was allowed to thoroughly dry.
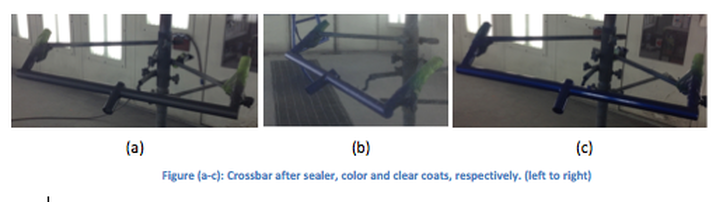
Once dry, all components were sanded with three-hundred twenty (320) grit sandpaper in order to remove any drips, overspray marks, or impurities from the surface of the part. All pieces were once again wiped down and cleared of any debris, and hung in a climate controlled room. The frame was then sprayed with a solvent-based black sealer coat. The purpose of this coat was to provide an even tone underneath the first coat Pearl Blue, so that the color would be consistent throughout the frame. This sealer coat was allowed to cure for 5 minutes, just like the primer, and the first coat of Nissan Pearl Blue was then applied over the sealer coat.
In order to be sure that all paint was dry before applying a second coat, the temperature in the climate-controlled room was turned up to one-hundred sixty-five (165) degrees Fahrenheit for a period of five minutes. Once cool, the second coat of pearl blue was applied, and again baked at one-hundred sixty-five degrees, this time for seven (7) to eight (8) minutes. The figure below illustrates the same portion of the frame during each phase of the final painting process.
Finally, two coats of a protective, solvent-based clear coat were applied, allowing five minutes in between coats just like the primer and sealer coats. When both coats were complete, the frame was again baked at one-hundred sixty-five (165) degrees, for thirty (30) minutes to fully cure all paint coats, and ensure that everything was correctly hardened. The end product was later outfitted with vinyl decals and those decals had a clear coat applied over them to protect them from expected wear and abuse.
